
How Much Does Airbnb Photography Cost?

With over 4 million Airbnb listings worldwide, competition is fierce for property hosts to stand out and attract more bookings. Professional photography has become an essential investment to showcase your space in the best light. But how much should you budget for an Airbnb photoshoot? The cost can vary significantly depending on the size of your property, image resolutions required, the number of images, and additional services. This guide breaks down the typical costs so you can make an informed decision. Lets take a look at how much does airbnb photography cost? Photography Service Fees Most Airbnb photographers charge a base service fee to cover their time and talent behind the camera. This starts from around £100 for a property with a current market value of under 300k. The fee is typically based on the service you get. Here’s a breakdown of the pricing for a property under £300,000 to have a better understanding of it: All the following if purchased with photos as part of a package- For a larger property valued over £3 million, the prices can be as follows: All the following if purchased with photos as part of a package- Some photographers may bundle this service fee in with the total costs or price per image, while others list it separately. Be sure to check if there’s a separate charge on top of the per photo rates listed. To make this easier for you- we have an online booking form which you can access here. Additional Photography Services On top of the base fees and per image rates, some Airbnb photographers offer extras services that add more value. Common upgrades include: These optional upgrades allow you to perfect photos digitally, create a mood, highlight selling features, or use videos to sell the experiences and view surrounding your property. While paying more for retouched photos or cinematic footage may seem costly upfront, it can help your listing compete with other exceptional listings that go the extra mile. Review your property strengths and weaknesses, your target guest and pricing to decide which extras are worth investing in. DIY Photography Costs Some property hosts prefer to handle photography themselves to save on costs. With a bit of practice, an entry-level DSLR camera, tripod, and editing software, you can produce decent photos yourself for little or no added spend. However, lacking the right gear and photography skills can result in sub-par amateur images that don’t showcase your property in the best light. Missing that wow factor can negatively impact your listing views, booking rates and rental yields. That’s why you should be extra careful with DIY property photography. Weigh up if compromise on quality to save a few hundred pounds is worth potentially losing thousands in lost bookings from unattractive photos. Paying a modest photography fee is often returned many times over in extra nights booked. Airbnb Photography Cost Considerations Attractive photos that cast your property in an enticing lifestyle light are invaluable for higher bookings and better reviews. But photography does involve an extra investment. To make the spend more palatable: Strike the right balance for your margins. Protect profitability but don’t compromise on visual impact in this highly competitive rental marketplace. With spiralling demand for short lets, quality photography is essential to rise out from the competition. If you want to learn more on how much your Airbnb listing photoshoot would cost, take a look at our Online Pricing Form. We hope we have answered your question- how much does airbnb photography cost.
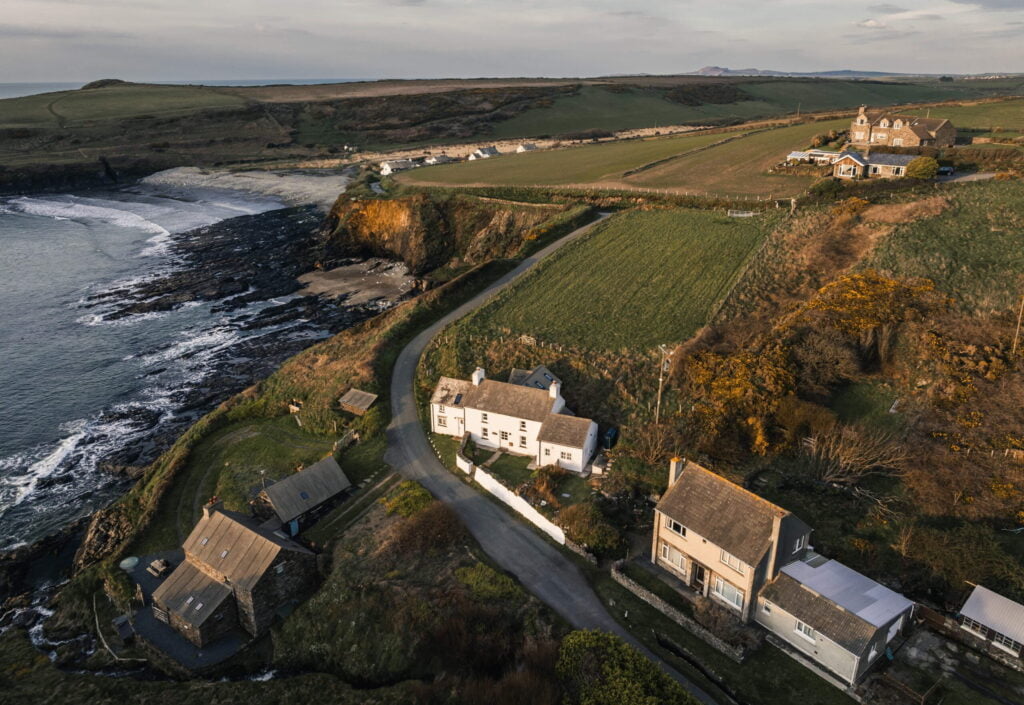
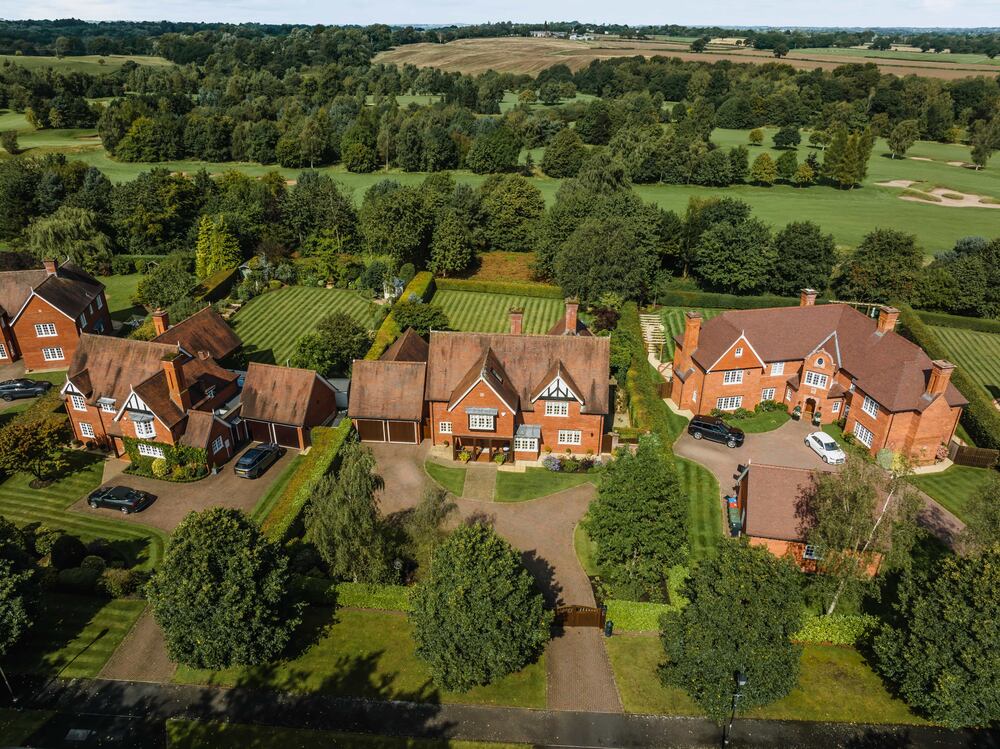
The Future of Property Photography
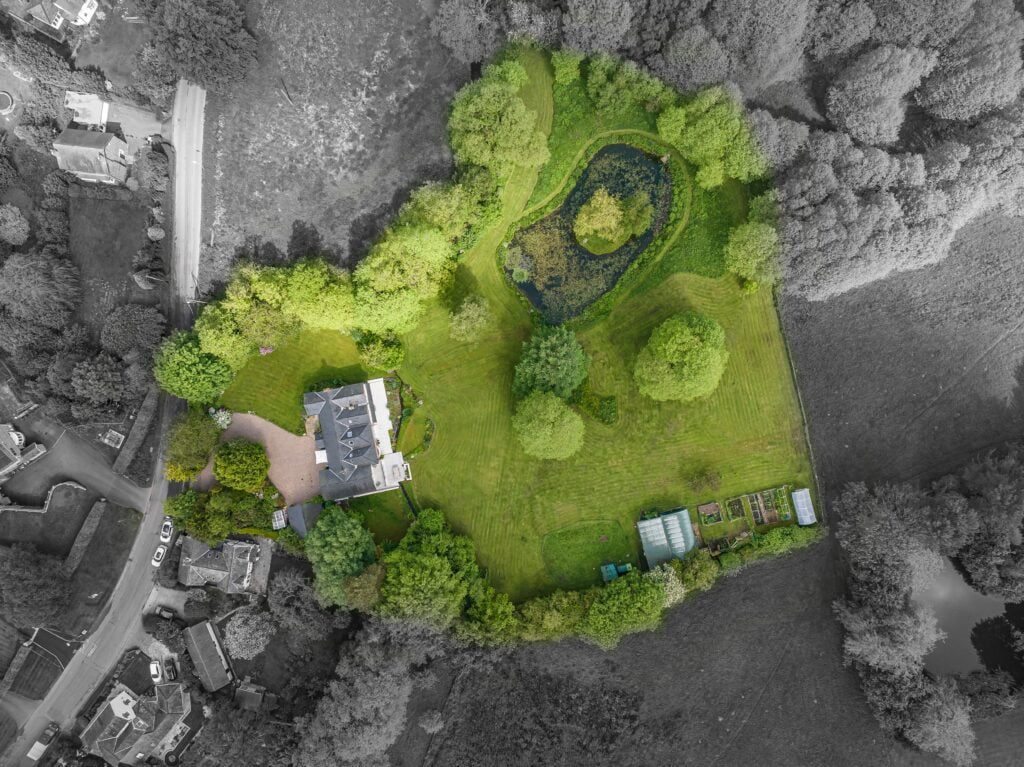
The property industry relies heavily on high-quality property photography to market and sell homes. As technology advances, new trends are emerging that are changing and improving real estate photography. Here are some of the prominent ways that property photography is likely to evolve in the coming years. Lets take a look at the future of property photography. 360-Degree Photography 360-degree photography is already growing in popularity for showcasing property listings. These virtual tours allow potential buyers to explore the entire home online from their computer or mobile device. While 360 photography requires more specialised equipment right now, this technology will likely become more affordable and accessible. As virtual and augmented reality continue making headway, 360-degree property photos could eventually become an industry norm. Aerial Photography by Drones The use of drone photography is rising in property as drones become less expensive and easier to operate. Aerial property photos captured by drones provide beautiful bird’s eye views that capture a home’s surroundings and place it in the context of the neighbourhood. Additionally, drone photography enables viewing homes and land from angles that were historically impossible. Drone operation rules are still being defined, but drones are clearly useful tools for property photographers to incorporate. Enhanced Editing Capabilities Advancements in digital photo editing software empower property photographers to produce clearer, cleaner, and more vibrant images than ever before. Tools like HDR imaging reveal shadowed rooms in perfect lighting. Meanwhile, programs that instantly edit out dust, wires, damage or other imperfections help photographers digitally stage homes to perfection. The improving editing capabilities translate to higher quality property photos. Artificial Intelligence Integration Early experiments pairing digital photography with artificial intelligence (AI) demonstrate assisting potential for real estate. For example, an AI could assess home photos and instantly edit them to optimal brightness/contrast levels for each room’s lighting conditions. More advanced applications could have AIs analysing property photos to extract insights about room dimensions/square footage, detect damage not visible to the human eye or even suggest optimised angles to highlight selling points. The AI potential in photography has barely been tapped but is likely to progress steadily. Live Video Walkthroughs Though static photos remain essential, videos bring an extra vibrancy that can capture unique home features. Live video walkthroughs facilitated by photographers further enhance interactivity for remote house hunters. Apps already enable real estate agents to provide instant video tours to clients. As mobile speeds/tech improve and virtual reality simulations progress, live video showings should gain adoption. Visual content shapes the home search process for today’s buyers, so video usage logically seems poised to expand through live-streaming walkthroughs or similar future platforms. Embedded Property Details Advancing camera technology may soon enable useful embedded data to be collected during property shoots beyond just photos alone. For example, special infrared cameras could gather insights on insulation effectiveness or detect leaks/moisture concealed within walls. Photogrammetry uses photo data points to construct virtual 3D models with exact room dimensions. As camera hardware/software grows more advanced, the additional layers of property details captured in images will bring further value to property photography. Final Words In recent years, high-resolution digital photography has transformed property listings and how homes are viewed during the buying process. While traditional quality photos will remain vital, new photography technologies are constantly emerging that promise to further enhance real estate marketing. As these trends influence and intersect with the photography sphere, they are likely to shape the continual evolution of property photography and listings. There is the future of property photography!
Gear You Need to Get Started with Property Photography
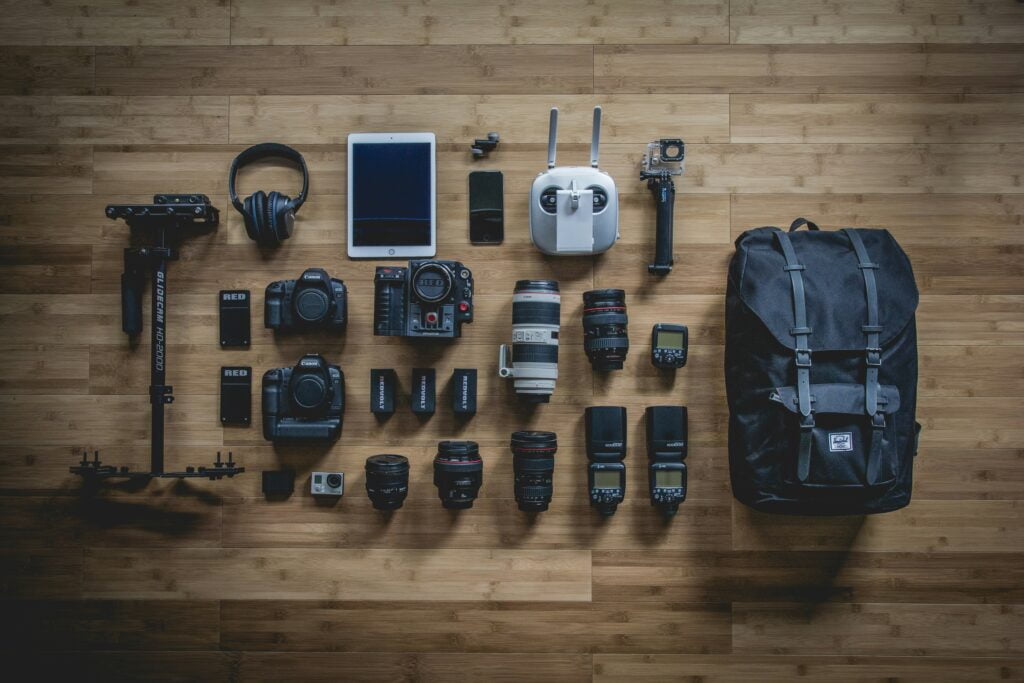
Getting into property photography is an excellent way to start a photography business or supplement your income as a photographer. With the high demand for marketing images for real estate listings and vacation rental properties, there are ample opportunities available. However, capturing beautiful, high-quality images of homes requires specialised gear suited for this type of photography. Unlike portrait or product photography which can be shot in a home studio, property photography requires gear that allows you to photograph both interior and exterior spaces. When starting, focus on acquiring versatile, affordable gear that will meet the basic needs of real estate and property managers. As your business grows, you can invest in more advanced equipment with additional capabilities and features. Here is the essential gear you need to get started with property photography: Camera Body An entry-level to mid-range DSLR camera with an 18-55mm kit lens is ideal when starting out. Top choices like the Nikon D3500, Canon Rebel T7i or Sony a6400 capture excellent quality images, have beginner-friendly controls, shoot video, and won’t break your gear budget. Eventually, upgrade to a full-frame camera for maximum image quality. The Ken Rockwell website is great for comparing all different kinds of gear. Wide Angle Zoom Lens The most useful lenses for property photography is a wide-angle zoom, such as a 10-18mm or 10-20mm lens. This allows you to capture the entire room and property exteriors when space is tight. Wider perspectives showcase more of the home in each image. Take a look at our portfolio, we have many wide angle images here. Tripod A critical piece of gear for property photography is a good tripod like the Zomei Q666. Tripods allow you to compose the perfect framing and shoot HDR exposures. Sturdy tripod heads offer flexibility for shooting straight-on and down angles. Remote Shutter Release A remote shutter release control connects to your camera via cable or wireless connection. This allows you to trip the camera shutter without touching the camera body minimising camera shake ensures the sharpest shots possible. Post Processing Software While not mandatory, using Lightroom editing software helps you develop raw files and perfect images with transforms like straightening crooked lines and perspective adjustments. This helps compensate for wide angle lens distortion. Gear Bags & Cases Protect your photography gear with dedicated camera bags, lens cases and padded pouches. Organise all your memory cards, batteries, cords and accessories in one place for seamless shooting. Transport all equipment safely when travelling between shoots. Insurance Insuring your camera gear protects you in the case of theft, damage or other unforeseen incidents. This safeguards your costly equipment and allows you to purchase replacement gear as needed. Final Words By starting out with versatile, affordable basic gear suited for property photography projects, you can start offering your services to estate agents immediately. As you grow your client base and refine your photography skills, invest in more specialised equipment to take your images to the next level. The key is building a solid gear foundation which supports your goals as a property photographer.
Property Photography Tips for Airbnb Listings in Manchester
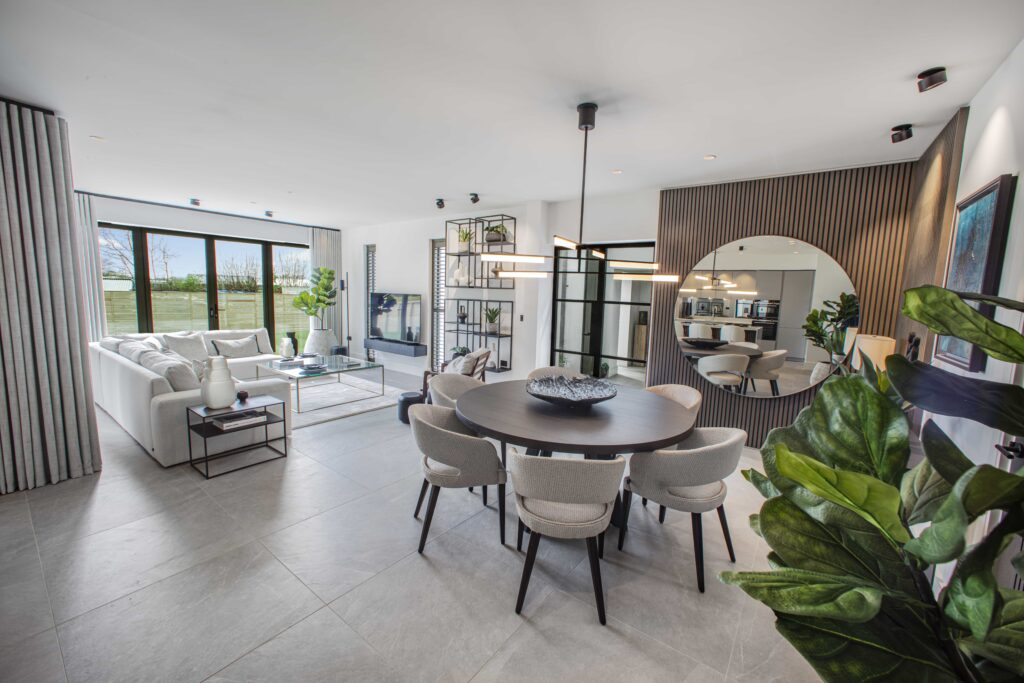
Manchester has many exciting tourism hotspots that are worth highlighting to potential Airbnb guests. From museums and galleries to iconic sports arenas, to vibrant food and drink scenes, Manchester has something for all interests. Some of the most prominent tourist attractions in Manchester include the Manchester Museum and Manchester Art Gallery at Mosley Street, Manchester Cathedral and Chetham’s Library for heritage, and the National Football Museum. People who visit to explore these attractions pick nearby Airbnbs for their convenience. With over 4,000 Airbnb listings in Manchester competing for guests’ attention, professional photography has become crucial for hosts to make their properties stand out. High-quality photos that showcase your home in the best possible light can capture potential guests’ interest and drive more bookings. Follow these photography tips to create standout imagery for your Manchester Airbnb rental: Use a Wide-Angle Lens A wide-angle lens allows you to fit more of the room into each shot, showing off more features and space. For small rooms, a 16-35mm (full frame) wide-angle zoom lens lets you exaggerate dimensions, so areas appear larger. Capture entire living spaces and bedrooms in one photo to highlight all amenities. Perfect the White Balance Adjusting the white balance compensates for different lighting conditions, preventing unsightly yellow or blue colour casts from tainting images. Test shots will enable you to calibrate whites under specific bulbs and sunlight. Properly balancing whites depicts accurate colours and a consistent style throughout listings. Style the Space Thoughtful styling elevates photographic appeal by coordinating colours, adding personality through accessories, fluffing pillows, and tidying clutter. Make beds with high-end linens and decorative pillows. Infuse brand identity via signage and amenities conveying precisely what makes your rental special. Focus on Standout Features Hero shots spotlighting striking architectural details like exposed brick accent walls, stainless steel appliances, spa bathrooms, or mod furnishings capture attention while conveying a lifestyle. Photograph special highlights like lounge areas, theatres, bars, balconies, or slit windows individually to showcase the advantages of your space compared to alternatives. Use Natural Light Abundant natural light minimises shadows and illuminates corners that might otherwise get lost. Photograph near large windows, sliding glass doors, and skylights. Reflectors can redirect sunshine into darker spaces as needed. For exteriors, overcast days create even illumination without harsh contrasts. Mind the Angles Shooting from multiple angles adds dimensionality while capturing more visual intricacies compared to straight-on shots. Atop ladders and staircases grant bird’s eye perspectives over rooms. Kneeling shoots upwards towards high ceilings to emphasise grandiosity. Creative compositional approaches showcase more personality at alluring angles guests crave. Portray Local Culture Infusing imagery with Manchester’s culture through wall art, Northern Quarter skyline perspectives from windows, football paraphernalia, or other local flair conveys the authenticity international travellers seek in short-term rentals. This grants a competitive edge over generic corporate apartments lacking regional charm. Proximity Showcases Granularity When photographing bedrooms, living rooms, and kitchens, get close and fill frames with furnishings, textures, and amenities. Granular details displayed up close enable potential guests to inspect quality bed linens, assess couch roominess, admire the upscale decor, and view the electronics offered. This transparency builds trust. By implementing these photography best practices showcasing your property and Manchester’s captivating urban landscape, your Airbnb listing will get noticed amongst competitors. Professional imagery converts viewers into enthusiastic guests envisioning themselves staying at your welcoming rental. With striking photos that spark desire, you can expect an uptick in occupancy and income. We hope you can improve your airbnb property photography with the above tips.
How Twilight Photography Can Transform Your Property
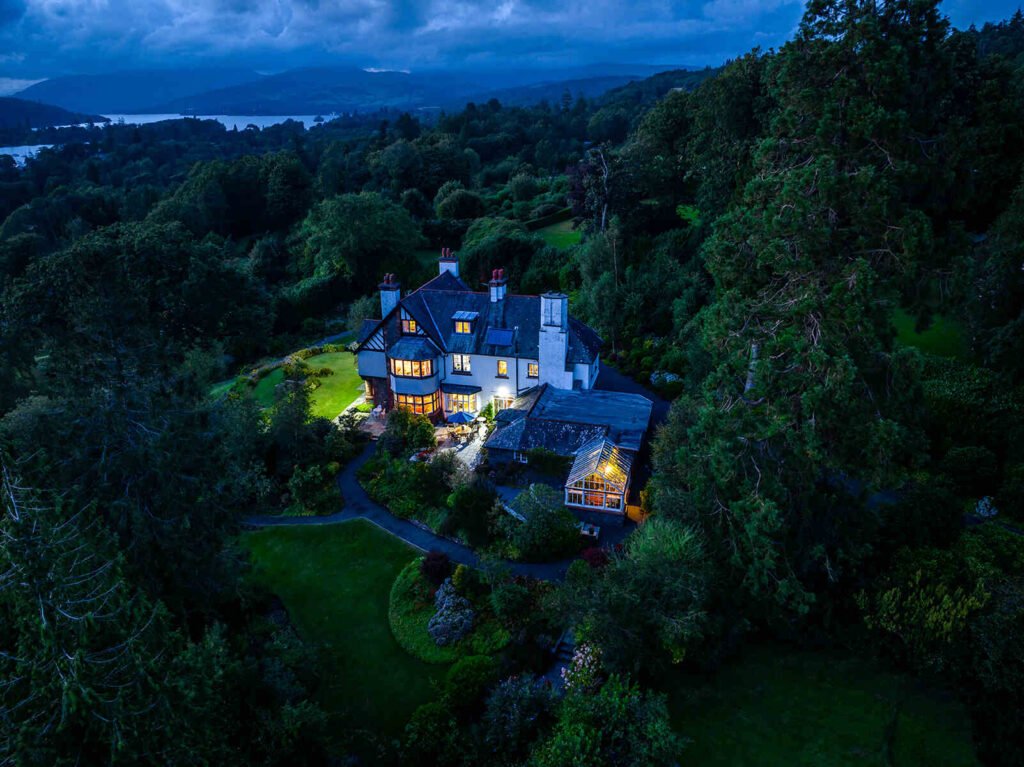
As the day transitions into night, there is a magical window of time when the lighting outdoors creates a beautiful, ethereal glow. This is known as twilight, or the “blue hour” and it offers a gorgeous backdrop that can utterly transform the look of your home or business. By having a talented photographer capture your property during the blue hour, you can showcase its architecture and landscaping bathed in warm, dramatic light that is flattering and eye-catching. Lets take a look at blue hour property photography! When Is the Best Time for Twilight Photos? The blue hour generally occurs twice a day – once after sunset and again before sunrise. After the sun fully sets, around dusk, there is still sunlight refracting in the upper atmosphere which creates a stunning blue tone in the sky. This deep blue glow gradually fades to reveal the stars and night sky. The duration of the blue hour changes depending on the time of year and your location, but it typically lasts around 30-40 minutes. Professional real estate and architectural photographers carefully watch sunset times and plan sessions during this short golden window when the lighting is ideal. Benefits of Twilight Photography There are several key benefits of having your home or business photographed during the blue hour: Twilight Photography Tips If you want to have your home or office photographed to take advantage of brilliant blue hour light, keep these tips in mind: Final Words The gorgeous lighting that occurs during the blue hour lasts for a short period of time but offers an incredible opportunity to showcase residential or commercial spaces in a breathtaking new way. Hiring a professional photographer to capture high quality images of your property illuminated at twilight is a smart investment that can pay dividends in terms of increased perceived value, visibility, and buyer interest. Take advantage of blue hour property photography to transform your listing!
Why Your Airbnb Needs Professional Photos
Having great photos can make or break your Airbnb listing. With over 6 million Airbnb listings worldwide, you need to make your space stand out to attract guests. Professional photos are key to presenting an accurate and enticing portrayal of your rental. If you are still not convinced, let’s go ahead and explore the reasons why you should consider getting professional photos for your Airbnb. Increase Bookings Research by Airbnb shows listings with professional photography get up to 20% more bookings than those without. Clear, high-quality photos give guests confidence they know what they’re going to get. Blurry, dark, or misleading photos are one of the top guest complaints on Airbnb. Investing in professional photography leads to more bookings, better reviews, and higher occupancy rates. Encourage Instant Booking Airbnb now encourages hosts to activate Instant Book, allowing guests to book without host approval. Data shows listings with Instant Book enabled get up to twice more bookings. To qualify for Instant Book, you must meet requirements like having a high response rate and no negative reviews. Having beautiful professional photos can increase guest confidence to book instantly without back and forth. Command Higher Rates An analysis by Made Comfy found rental listings with professional photos command rates that are 24% higher per night than comparable rentals with amateur photos. Travellers associate high-quality images with an elevated experience and are willing to pay more. Clean, bright, stunning photos emphasise the best features of your space, helping justify higher rates. Highlight Unique Details Professional photographers skilfully utilise lighting, angles, composition and editing to highlight the very best features of your space. Showcasing unique architecture, custom decor or local art helps your listing stand apart. Crisp images emphasise little details that amateur shots might miss like spa-like bathrooms, chef’s kitchens, or designer furnishings. Helping potential guests connect emotionally boosts conversions. Inspire Guest Confidence Great photos provide guests visual confirmation that your listing matches the description. Amateur photos leave room for doubt, making travellers hesitant to book. Vibrant images showcase the layout, amenities, and atmosphere so guests know what to expect. Photoshopped images that misrepresent the property lead to complaints. Professional photography presents an honest portrait building guest trust. Photos Drive the First Impression Photos are critical for capturing a traveler’s interest when browsing listings. A guest’s first impression of your space impacts their whole perception of your rental. High-quality images typically equate to a high-quality Airbnb experience in the minds of travellers. All listing photos should be consistent in style for cohesiveness and branding. Maximise Exposure on Other Sites Beautiful professional photography doesn’t just help your listing on the Airbnb platform. Well-composed images will make your space shine no matter where they are displayed online. If you cross-list your Airbnb on sites like Booking.com, VRBO or TripAdvisor, stunning photos will capture attention, improve click through rates and drive bookings across multiple platforms. Final Words As you can see, investing in professional Airbnb photography leads to more bookings, faster bookings, less time hosting, and higher rental rates. Given the strong ROI, quality photography should be a priority for any Airbnb host looking to maximise their listing’s success. Skimping on photos to save money often ends up costing hosts far more in lost revenue. Professional photography delivers the quality images travellers want to see.
Dos and Don’ts when Hiring a Property Photographer
When putting a property on the market, hiring a professional property photographer is important. It can help you to effectively showcase the home and attract potential buyers. However, not all property photographers provide the same level of quality, service, and results. It’s important to understand the key dos and don’ts when selecting and working with a property photographer. From initial research to final photo delivery, keeping these best practices in mind helps ensure you end up with stunning visual content to maximise interest and appeal for your listing. Dos when Hiring a Property Photographer Do your research. Look at potential photographers’ online portfolios to get a feel for their style and see examples of their previous property photo shoots. Check reviews and testimonials to understand others’ experiences working with them. Discuss your needs and expectations. Be very clear about exactly what photos you need, including different rooms, outdoor spaces, etc. Talk about your goals for the photos such as marketing the property online or including them in print listings. Ask about equipment and editing. Find out what type of camera, lenses, lighting, and other gear they use. You want to be sure the equipment is high quality and suitable for taking sharp, bright real estate imagery. Also ask about their editing process to polish and perfect the photos. Consider all costs upfront. Reputable photographers will provide you with an itemised estimate accounting for their shoot fee, travel expenses, editing time, and any additional photo products or services like virtual staging. There should be no hidden surprises. We have an online booking page where you can get a quote instantly, you can take a look here to get an idea for pricing. Ask about turnaround time. Find out when you can expect to receive the final set of photos so there are no delays or mismatched expectations. Many real estate photographers deliver edited images within a week after shooting. Don’ts when Hiring a Property Photographer Don’t simply choose based only on price. While budget is important, it should not be the deciding factor. An extremely low-priced photographer is likely to cut corners somehow in equipment, experience, editing, etc. Don’t overlook professionalism. Beware photographers who show up late, seem disorganised on the shoot, or are difficult to communicate and coordinate with. You want someone reliable and professional. Don’t accept rushed sloppy editing. If sample images contain obvious flaws like visible dust spots, crooked horizons, over-sharpening artefacts and more, this signals problematic editing you want to avoid. More on that here. Don’t get pressured into purchasing more. Some less ethical photographers will aggressively upsell you on purchasing additional prints, digital files, and photo products you may not need quite yet. Final Words Hiring the right real estate photographer takes some savvy evaluation of factors like portfolio, equipment, experience, and vision aligning with your needs. By following the dos for finding photographic professionals with verified skills and creativity, your home listing images will shine beautifully to expedite a profitable sale.
Golden Hour: Natural Light for Stunning Property Photos

As a property photographer, capturing a property at its absolute best is crucial for effectively marketing listings. One of the most powerful techniques for making any space look its brightest and most inviting is to photograph it bathed in golden hour light. Lets take a look at the golden hour in property photography. What is the Golden Hour? The golden hour refers to the first hour after sunrise and the last hour before sunset when the quality of natural light produces warm, soft lighting and long, dramatic shadows. During this fleeting period, the sun sits low on the horizon, bathing the landscape in a golden, reddish glow that flatters almost any subject. Unlike the harsh midday light that casts dark shadows and highlights unflattering contrasts, golden hour light is diffused as it passes through more atmosphere. This soft, directional lighting creates a warm, welcoming ambience perfect for showing off your listings. The Science Behind the Magic The unique quality of golden hour light is primarily due to the angle of the sun. During early morning and late afternoon, sunlight enters the atmosphere at an oblique angle. More of the higher frequency blue light scattering occurs, allowing more of the lower frequency red and yellow hues to come through, bathing the landscape in signature golden tones. The low angle of the sunlight also produces soft shadows and highlights facial features in an exceptionally flattering way. This is why portrait photographers also utilise the golden magic hour. It’s fleeting though, lasting only about an hour each morning and evening. That gives you a tight window to harness the most atmospheric natural light possible. Preparing for Success Capturing listing photos during the golden hour versus midday requires some advance preparation and perfect timing: Check sunrise/sunset times – Know exactly when your area’s magic hour window will open so you can be set up ahead of time. Scout shot locations – Identify outdoor and indoor spaces bathed in golden hour light. Consider how the sunlight will enter rooms through windows and glass doors. Having a shot list keeps you focused when time is limited. Adjust camera settings – Using manual mode allows you to dial in the ideal exposure and white balance quickly as the lighting shifts. Bracket important shots as backup. Have all equipment ready – Have cameras, lenses, props, reflectors, and supports in place to make efficient use of fleeting moments. Shoot interior first, just before the sun sets, then head outside for exterior shots during the golden hour. I use an app called GoldenHourOne to help with this, it also gives you a rating /10 on the potential sunset/rise. Even websites like the MetOffice can provide useful information with forecasts. By understanding the science behind golden hour light and preparing properly to harness its atmospheric glow for real estate photography, you can showcase every home at its absolute best. Compelling photos bathed in golden hues create maximum appeal and drive buyer interest. If you would like your property photographed in these conditions, get in touch today! The golden hour in property photography is a powerful tool when utilised properly.
How to Avoid Legal Issues with Drone Property Photography
Drones have opened up exciting possibilities for real estate photography and videography. Getting beautiful aerial shots of properties can really make listings stand out. However, operating drones for commercial purposes comes with legal requirements that you need to follow in order to avoid fines or other penalties. Here are some tips to keep your drone property photography business on the right side of UK law and avoid legal issues with drone property photography. Register as an Operator The first step to legally using drones for commercial flights in the UK is to register as an operator with the Civil Aviation Authority (CAA). This involves taking and passing an online education course as well as paying a registration fee. Once registered, you will receive an Operator ID to openly display on your drones. Failing to register could lead to prosecution. Don’t Fly Drones Above 120 Meters The legal height limit for drones in the UK is 120 meters (400ft). Going any higher risks collisions with manned aircraft and violates regulations set forth by the CAA. Staying under this altitude threshold helps ensure you comply with the rules. Some drones have built-in safety settings to prevent you from exceeding the height ceiling. Maintain Clear Line of Sight Rules in the UK mandate that drone operators keep their unmanned aerial vehicles within their visual line of sight at all times. So, you can’t fly your drone behind buildings or out of view. Keeping continuous line of sight helps you avoid collisions and fly responsibly. You should also have a spotter standing alongside you to assist with maintaining situational awareness. Get Permission from Property Owners Before launching your drone to photograph someone else’s property, be sure to get their consent. As a courtesy, let your clients know ahead of time that you’ll be using a drone and assure them about your adherence to CAA rules. Showing neighbours that you have the property owner’s permission might also prevent nosy onlookers from reporting you. Keep documentation that demonstrates the property owner agreed to the drone photography. Consider Privacy Implications Be mindful of privacy when photographing residential properties with aerial drones. Shots peering over fences or capturing the inside of windows where people have a reasonable expectation of privacy could infringe legal protections and land you in hot water. Intentionally capturing identifiable photos of individuals without their permission could also raise privacy issues. Stick to photographing the building’s exterior to play it safe. Consider Getting Insurance Operating drones commercially comes with risks, including crashes, flyaways, and potential injuries or property damage. Carrying insurance can protect you from expensive legal claims in such events. There are drone insurance policies available to cover liability, hull damage, payload issues, and more. Having coverage gives you peace of mind in case the worst happens while working. Check policies carefully as drone insurance can vary widely on aspects like qualifying pilot requirements, excluded drone activities, and territorial limitations. Finding the right policy for your UK-based drone photography business is prudent. Understand Privacy Injunction Zones Certain locations in the UK have been granted ‘privacy injunctions’ which prohibit taking identifiable photographs without permission. These zones legally protect public figures, government officials, or other prominent people’s private property from photography, even shots taken from public areas. Violating privacy injunction airspace with drones’ risks facing contempt of court claims or injunction breaches. Avoid No Fly Zones There are many zones in the UK that are illegal to fly in. These include- near airports, stadiums, prisons and military sites. You can check whether the location you are flying from is in these areas by visiting this website. Final Words Following these steps will help ensure your commercial drone operations for property photography stay within lawful bounds in the UK. As the rules and technologies evolve, be sure to keep up to date on the latest regulations and best practices from the CAA. Responsible drone use has incredible power to take property marketing to new heights while keeping your business on the right side of the law. Take a look at some of our drone images of property here. Thats how to avoid legal issues with drone property photography!
10 Video Strategies for Your 2024 Estate Agency Success
As we move into 2024, video content remains one of the most powerful tools for real estate agents to engage with their audience and showcase their expertise. Whether you’re a seasoned agent or just starting, these 10 video ideas will help you create compelling content and stand out in the crowded online space. Here are some video strategies for estate agencies! Virtual Home Tours Virtual home tours have become increasingly popular, especially on platforms like Instagram and TikTok. Showcase your listings by creating engaging virtual tours that highlight the unique features and benefits of each property. Don’t forget to mention key details such as the number of bedrooms, bathrooms, square footage, and lot size. Property Market Updates Keep your audience informed about the latest trends and changes in the real estate market. Create monthly or quarterly market update videos that discuss interest rates, home prices, and market predictions. Incorporate a call-to-action directing viewers to your website, where they can sign up for your newsletter or check their home’s current value. Neighbourhood Spotlights Help potential buyers get a feel for the neighbourhoods you serve by creating videos that showcase local attractions, restaurants, and amenities. Collaborate with local business owners to feature their establishments in your videos, which can help expand your reach and build relationships within the community. Home Staging Tips Provide valuable advice to sellers by creating videos that offer home staging tips. Share strategies for decluttering, rearranging furniture, and making simple improvements that can help a home sell faster and for a higher price. We have a home staging guide you can access here. Home Renovation Ideas Inspire homeowners with renovation ideas that can increase their property’s value. Highlight before-and-after transformations, discuss popular design trends, and offer tips for achieving a high-end look on a budget. First-Time Homebuyer Series Create a series of videos tailored to first-time homebuyers, addressing common questions and concerns. Walk them through the buying process, from getting pre-approved for a mortgage to closing on their dream home. Offer guidance and support to help alleviate the stress and uncertainty that often comes with purchasing a first home. Seller Tips and Advice Develop a series of videos that provide valuable insights for sellers. Cover topics such as pricing strategies, preparing a home for sale, and navigating the selling process. Address frequently asked questions, such as how to sell a home while simultaneously buying a new one. Client Testimonials Build trust and credibility by featuring client testimonials in your videos. Ask satisfied clients to share their experiences working with you and how you helped them achieve their real estate goals. These authentic endorsements can be incredibly persuasive for potential clients. FAQs Create videos that address the most common questions you receive from clients and prospects. Topics may include property taxes, homeowners’ insurance, or the differences between various types of mortgages. By providing clear, concise answers, you’ll demonstrate your expertise and build trust with your audience. You can use something like chatgpt to generate a list of FAQs for additional help. Behind-the-Scenes Glimpses Give your audience a behind-the-scenes look at your day-to-day life as an estate agent. Show yourself making calls, hosting open houses, or collaborating with colleagues. These candid glimpses help humanise your brand and create a stronger connection with your audience. Final Words As you create your video content, remember that consistency and value are key. Don’t be discouraged if your videos don’t immediately gain traction; focus on providing helpful, informative content that addresses your audience’s needs and concerns. By implementing these 10 video ideas and regularly sharing your expertise, you’ll be well on your way to becoming a go-to resource for real estate advice in 2024 and beyond. There are some powerful video strategies for estate agencies, use them wisely!